Executive Summary
Your home Wi-Fi network is the foundation of your smart home’s security — and the weakest link cybercriminals target first. With 71% of IoT devices connecting via Wi-Fi and home networks experiencing an average of 29 attack attempts daily, securing your network is no longer optional. This comprehensive guide walks you through building an impenetrable network fortress, from basic WPA3 encryption to advanced segmentation strategies, VPN deployment, and intrusion detection. Whether you’re setting up your first smart device or managing 20+ connected gadgets, this step-by-step blueprint will transform your vulnerable home network into a security stronghold.
Why Your Network Is the #1 Target
Before diving into solutions, understand why attackers focus on home networks:
The Network Is the Gateway
Once a hacker breaches your Wi-Fi, they gain access to:
- Every connected device (cameras, locks, thermostats, computers, phones)
- All network traffic (passwords, credit cards, private messages)
- Your internet connection (to launch attacks against others)
- Physical security controls (smart locks granting home entry)
Home Networks Are Easy Targets
Most home networks have:
- Weak passwords (short, dictionary words, family names)
- Outdated encryption (WEP, WPA, weak WPA2)
- Default router settings (unchanged admin passwords)
- No segmentation (all devices on one network)
- Disabled firewalls (for convenience or gaming)
- No monitoring (users never check logs)
The Statistics Paint a Grim Picture
2026 Home Network Threat Data:
- 29 attack attempts per household daily
- 46% of employees connect personal IoT to work networks
- 52% of organizations experienced attacks via IoT devices
- 71% of IoT devices use Wi-Fi (creating massive attack surface)
- Average time to breach weak Wi-Fi: 2-10 hours
Real-World Attack Scenario
Hour 0: Attacker parks outside your home with laptop Hour 1: Scans for Wi-Fi signals, identifies your network Hour 2-8: Automated password cracking tools work Hour 9: Access gained to your network Hour 10: Device reconnaissance begins (identifying cameras, locks, computers) Hour 12: First device compromised (often a camera or router) Hour 24: Full network control, data exfiltration begins Week 1: Months of surveillance without detection
This isn’t theoretical. It happens thousands of times daily.
The 5-Layer Network Security Framework
Building a secure smart home network requires five integrated layers. Each layer adds defense depth, ensuring multiple barriers between attackers and your devices.
Layer 1: Router Security Hardening
Your router is the gatekeeper. If it’s compromised, nothing else matters.
Step 1: Change the Default Admin Password
Why It Matters:
Routers ship with default admin credentials that are publicly documented online. Hackers maintain databases of default passwords for every router model. If you haven’t changed yours, you’re vulnerable.
How to Change It:
- Access router admin panel (usually
192.168.1.1or192.168.0.1) - Log in with current credentials (check router label or manual)
- Navigate to Administration → Password
- Create a 16+ character password with mixed characters
- Save and log back in to verify
Password Requirements:
- Minimum 16 characters
- Mix of uppercase, lowercase, numbers, symbols
- No dictionary words
- Unique to this router (not used elsewhere)
Example Strong Password:
Tr0ut&Maple$2026!Network
Step 2: Disable WPS (Wi-Fi Protected Setup)
Why WPS Is Dangerous:
WPS allows devices to connect via push-button or 8-digit PIN. The PIN method has a critical vulnerability: attackers can brute-force it in 4-10 hours.
How to Disable:
- Router admin panel → Wireless Settings → WPS
- Toggle OFF or Disable
- Save settings
Alternative: If you need easy connection, use WPS for setup only, then immediately disable it.
Step 3: Update Router Firmware
Why Firmware Matters:
Router vulnerabilities are discovered constantly. Outdated firmware contains known exploits that hackers actively target.
How to Update:
Automatic Updates (Best):
- Router admin panel → Administration → Firmware
- Enable “Automatic Updates”
- Set update schedule (e.g., 3 AM weekly)
Manual Updates:
- Visit manufacturer website
- Download latest firmware for your exact model
- Router admin panel → Administration → Firmware Update
- Upload file and install
- Router will reboot (5-10 minutes)
Update Frequency:
- Check monthly minimum
- Enable notifications for critical security patches
Step 4: Enable the Router Firewall
Why Firewalls Matter:
Firewalls block unauthorized incoming connections and can filter malicious traffic patterns.
How to Enable:
- Router admin panel → Firewall or Security
- Enable “SPI Firewall” (Stateful Packet Inspection)
- Enable “DoS Protection” (Denial of Service)
- Enable “Block Ping from WAN” (prevents reconnaissance)
- Save settings
Additional Firewall Features:
- Port forwarding rules: Only open ports you specifically need
- DMZ: Never use DMZ for smart home devices
- UPnP: Disable unless specific apps require it (creates security holes)
Step 5: Disable Remote Management
Why Disable It:
Remote management allows router configuration from the internet. Unless you have a specific need, this creates an unnecessary attack vector.
How to Disable:
- Router admin panel → Administration → Remote Management
- Set to “Disabled” or “Off”
- If needed, restrict to specific IP addresses only
- Save settings
Step 6: Change the Default Router IP Address
Why Change It:
Default router IPs (192.168.1.1, 192.168.0.1) make it easier for malware to find and attack your router.
How to Change:
- Router admin panel → LAN Settings → Router IP
- Change to uncommon address (e.g.,
10.22.44.1) - Save (router will reboot)
- Access router using new IP going forward
Note: This breaks bookmarks, so update them.
Layer 2: Wi-Fi Encryption & Authentication
Encryption protects data traveling between devices and your router.
Step 1: Upgrade to WPA3 Encryption
Why WPA3:
WPA3 is the latest Wi-Fi security standard, offering:
- 192-bit encryption (vs. 128-bit in WPA2)
- Protection against brute-force attacks
- Forward secrecy (past traffic stays encrypted even if password compromised)
- Protection on public networks (individualized data encryption)

- Router admin panel → Wireless Settings → Security
- Select “WPA3-Personal” or “WPA3-SAE”
- If devices don’t support WPA3, choose “WPA2/WPA3 Transition Mode”
- Save settings
Device Compatibility:
Most devices from 2020+ support WPA3. Older devices may need WPA2/WPA3 mixed mode.
Check Device Support:
- iPhone: iOS 13+ (iPhone 7+)
- Android: Android 10+
- Windows: Windows 10 (May 2019 update+)
- Mac: macOS Catalina+
Step 2: Create an Uncrackable Wi-Fi Password
Password Requirements:
- Minimum 20 characters (25+ recommended)
- Mix of uppercase, lowercase, numbers, symbols
- Not based on dictionary words
- Not related to you (no names, birthdays, addresses)
Example Strong Password:
BlueMountain$2026&SecureHome!
Password Strength Test:
At 20 characters with mixed case/numbers/symbols:
- Time to crack: 438 trillion years
- At 12 characters: 2 years
- At 8 characters: 8 hours
How to Change:
- Router admin panel → Wireless Settings → Password/Passphrase
- Enter new password
- Save (all devices will disconnect)
- Reconnect devices with new password
Pro Tip: Use a password manager to generate and store the password.
Step 3: Hide Your SSID (Network Name)
Why Hide It:
Broadcasting your SSID makes your network visible to everyone within range. Hiding it adds a small barrier to casual attackers.
How to Hide:
- Router admin panel → Wireless Settings → SSID Broadcast
- Set to “Disabled” or “Hidden”
- Save settings
Connecting After Hiding:
Devices must manually enter the SSID name and password. Go to Wi-Fi settings → “Add Network” or “Other Network.”
Trade-off:
Hiding SSID adds inconvenience but minimal security (determined attackers can still discover hidden networks). It’s best combined with other measures.
Step 4: Enable MAC Address Filtering
What Is MAC Filtering:
Every network device has a unique MAC (Media Access Control) address. MAC filtering creates an allowlist of authorized devices.
How to Enable:
- Router admin panel → Wireless Settings → MAC Filtering
- Enable “Allowlist” or “Whitelist” mode
- Add MAC addresses of all your devices
- Save settings
How to Find MAC Addresses:
- Windows: Open Command Prompt → type
ipconfig /all→ look for “Physical Address” - Mac: System Preferences → Network → Advanced → Hardware → MAC Address
- iPhone: Settings → General → About → Wi-Fi Address
- Android: Settings → About Phone → Status → Wi-Fi MAC Address
Pro Tip: Label each MAC address in your router (“Jane’s iPhone,” “Living Room Camera”) so you remember what’s what.
Limitation:
MAC addresses can be spoofed, so this isn’t foolproof. But it adds friction for attackers.
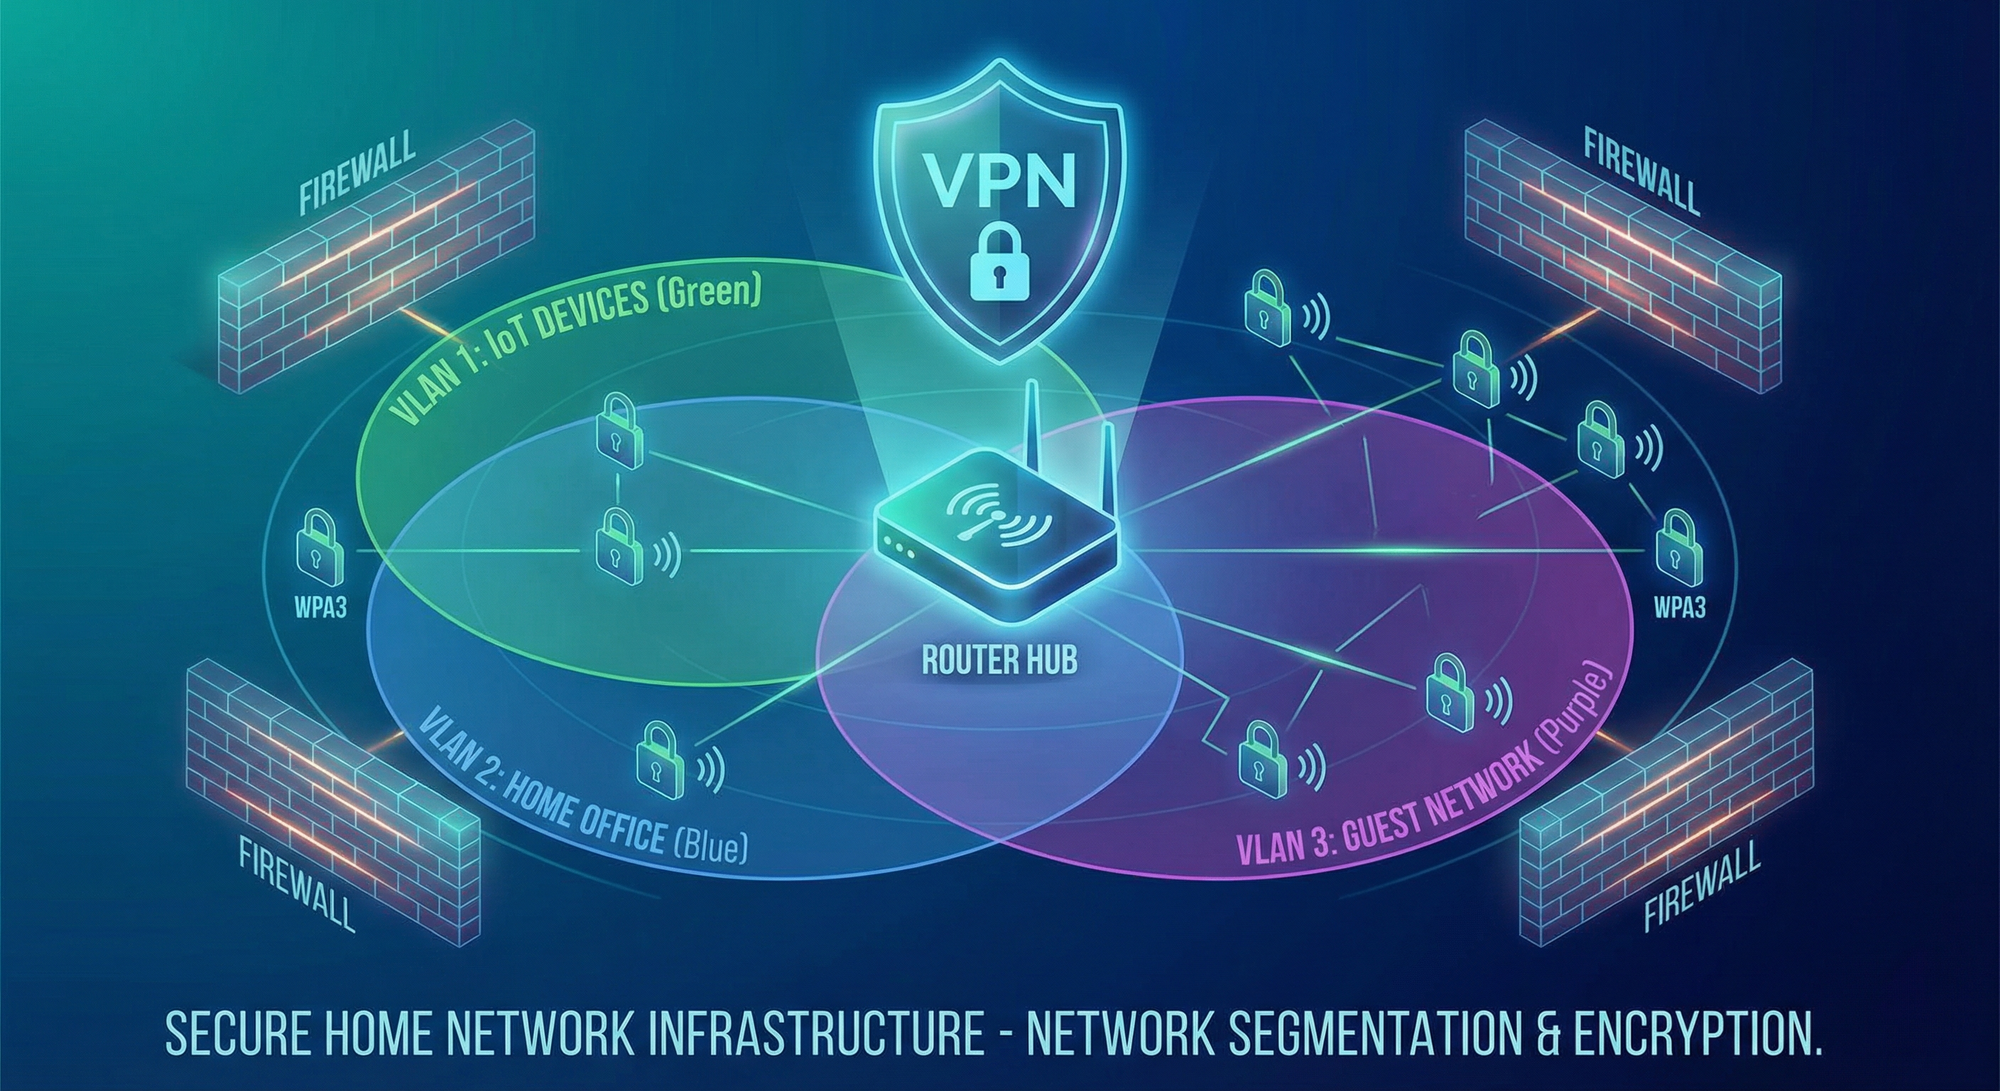
Layer 3: Network Segmentation (The Game-Changer)
Network segmentation isolates IoT devices from critical systems, containing breaches.
Why Segmentation Is Critical
The Problem:
If all devices are on one network, a compromised smart bulb can:
- Access your computer’s files
- Intercept your banking session
- Steal passwords from your phone
- Control your smart locks
The Solution:
Create three separate networks, each with different access levels:
- Primary Network → Computers, phones, tablets (trusted devices)
- IoT Network → All smart home devices (untrusted)
- Guest Network → Visitors (isolated entirely)
How to Create Separate Networks
Method 1: Guest Network Feature (Basic)
Most routers include a “Guest Network” feature:
- Router admin panel → Guest Network
- Enable Guest Network
- Set unique SSID (e.g., “SmartHome-IoT”)
- Set strong password (different from main network)
- Enable “Isolate Guests” or “No Local Network Access”
- Save settings
Connect all IoT devices to this guest network.
Limitations:
- Guest networks often disable isolation by default (check settings!)
- Some routers only allow one guest network
- Guest networks may have reduced bandwidth
Method 2: VLAN Segmentation (Advanced)
VLANs (Virtual Local Area Networks) create true network isolation at the router level.
Requirements:
- Router with VLAN support (most modern routers)
- Managed switch (optional, for wired devices)
- Basic networking knowledge
Setup Steps:
- Router admin panel → LAN → VLAN Settings
- Create VLAN 1 (Primary) → subnet
192.168.1.0/24 - Create VLAN 2 (IoT) → subnet
192.168.2.0/24 - Create VLAN 3 (Guest) → subnet
192.168.3.0/24 - Assign wireless networks to VLANs
- Configure firewall rules to prevent VLAN 2 from accessing VLAN 1
Firewall Rules (Example):
Rule 1: BLOCK traffic from VLAN 2 (IoT) to VLAN 1 (Primary)
Rule 2: ALLOW traffic from VLAN 1 to VLAN 2 (for controlling IoT)
Rule 3: BLOCK all traffic from VLAN 3 (Guest)
Rule 4: ALLOW IoT devices to internet only
Pro Tip: Label your Wi-Fi networks clearly:
Smith-Family(Primary)Smith-IoT(IoT Devices)Smith-Guest(Visitors)
Advanced Segmentation: Device Grouping
Group IoT devices by security level and trust:
High-Security VLAN (VLAN 2):
- Smart locks
- Security cameras
- Alarm systems
Medium-Security VLAN (VLAN 3):
- Smart lights
- Thermostats
- Voice assistants
Low-Security VLAN (VLAN 4):
- Smart TVs
- Entertainment devices
- Experimental gadgets
Firewall Rules:
- VLAN 2 can communicate with VLAN 3 (locks control lights)
- VLAN 4 completely isolated
- All VLANs blocked from Primary network
Layer 4: VPN Deployment for Whole-Home Protection
A VPN (Virtual Private Network) encrypts all traffic leaving your network, protecting against ISP surveillance, data interception, and geofencing bypasses.
Why VPNs Matter for Smart Homes
Without VPN:
- ISP sees all your traffic (device activity, websites, streaming)
- Hackers can intercept unencrypted IoT traffic
- Smart home data exposed to tracking
With VPN:
- All traffic encrypted end-to-end
- ISP sees only encrypted tunnel (no content)
- Geofencing bypassed (access content from any region)
- Additional privacy layer
VPN Deployment Methods
Method 1: Router-Level VPN (Best)
Install VPN directly on your router, automatically protecting all connected devices.
Recommended VPN Routers:
- ExpressVPN Aircove ($189) — Purpose-built VPN router
- GL.iNet Flint 2 ($169) — OpenWRT with VPN support
- Asus RT-AX86U ($250) — Built-in VPN client
- Netgear Nighthawk R7000 ($150) — DD-WRT compatible
Setup Steps (ExpressVPN Aircove Example):
- Purchase ExpressVPN subscription ($8-13/month)
- Purchase ExpressVPN Aircove router
- Connect router to modem
- Follow setup wizard (5 minutes)
- Enable VPN for all devices or by device group
- Done — entire home protected
Device Grouping Feature:
Aircove allows assigning different VPN locations to device groups:
- Primary Network: US server (banking, work)
- IoT Network: UK server (privacy)
- Streaming Devices: Canada server (content access)
Method 2: Install VPN on Existing Router
If your router supports VPN clients (Asus, Netgear, many others):
- Sign up for VPN service (ExpressVPN, NordVPN, Surfshark)
- Download router configuration file from VPN provider
- Router admin panel → VPN → Add VPN Client
- Upload configuration file
- Connect to VPN
- Verify IP address changed (visit whatismyip.com)
Routers with Native VPN Support:
- Asus (most models)
- Netgear Nighthawk series
- TP-Link Archer series
- Linksys WRT series
Method 3: Individual Device VPNs (Least Effective)
Install VPN apps on each device. This works for computers/phones but NOT most IoT devices (cameras, locks, thermostats don’t support VPN apps).
Best Use: Supplement router-level VPN for mobile devices when outside home.
VPN Performance Considerations
Speed Impact:
VPNs introduce overhead:
- Good VPN: 10-20% speed reduction
- Poor VPN: 40-60% speed reduction
Recommended VPN Services (2026):
- ExpressVPN — Fastest, best router support
- NordVPN — Strong security, good speeds
- Surfshark — Unlimited devices, budget-friendly
- ProtonVPN — Privacy-focused, Switzerland-based
Avoid Free VPNs:
Free VPNs often:
- Log and sell your data
- Inject ads
- Have data caps
- Offer terrible speeds
- Lack security features
Layer 5: Monitoring, Intrusion Detection & Response
Active monitoring detects threats before they cause damage.
Step 1: Enable Router Logging
What Logs Capture:
- Device connection/disconnection events
- Authentication failures (wrong password attempts)
- Unusual traffic patterns
- Firewall block events
- Firmware update events
How to Enable:
- Router admin panel → System Log or Administration
- Enable logging
- Set log level to “Informational” or “Warning”
- Save settings
How to Review Logs:
- Check weekly for suspicious activity
- Look for unknown devices
- Check failed login attempts (indicator of attack)
- Monitor traffic spikes
Automated Tools:
Some routers offer email alerts for:
- New device connections
- Failed login attempts
- Firmware updates available
Step 2: Deploy Network Security Appliances
Dedicated security devices monitor network traffic in real-time.
Recommended Devices:
1. Firewalla Gold Plus ($469)
- Deep packet inspection
- Intrusion detection/prevention (IDS/IPS)
- Ad blocking
- VPN server (access home network remotely)
- Device grouping and parental controls
2. Norton Core ($150)
- Real-time threat detection
- Automatic device vulnerability scanning
- Norton Security software included
- Easy setup (consumer-friendly)
3. Bitdefender Box 2 ($249)
- Bitdefender antivirus for all devices
- Network vulnerability scanning
- Parental controls
- Ransomware protection
4. Cujo AI ($99 + $99/year)
- AI-powered threat detection
- Smart home security focus
- Parental controls
- Easy mobile app management
How They Work:
- Connect between modem and router (or router and network)
- All traffic flows through security device
- AI analyzes traffic patterns
- Threats blocked automatically
- Alerts sent to mobile app
Example Alert:
⚠️ Security Alert
Device: Living Room Camera (192.168.2.15)
Threat: Botnet recruitment attempt
Action: Connection blocked
Time: 2026-01-27 14:32:18
Step 3: Implement Intrusion Detection System (IDS)
What Is IDS:
IDS monitors network traffic for suspicious patterns indicating attacks.
IDS Types:
1. Signature-Based: Detects known attack patterns 2. Anomaly-Based: Detects unusual behavior (e.g., camera suddenly uploading 10 GB) 3. Hybrid: Combines both methods
Popular IDS Tools:
For Advanced Users:
- Snort (open-source IDS) — Runs on Raspberry Pi or dedicated PC
- Suricata (open-source IDS/IPS) — High-performance threat detection
- Security Onion (Linux distribution) — Complete security monitoring suite
For Average Users:
Use built-in features in Firewalla, Norton Core, or similar appliances.
Step 4: Set Up Device Activity Notifications
Enable alerts for critical devices:
Smart Locks:
- Notify on every unlock
- Alert on failed access attempts
- Notify on battery low
Security Cameras:
- Alert on motion detection
- Notify on offline events
- Alert on settings changes
Network:
- New device connections
- Unusual data usage
- Firmware updates available
How to Enable:
Most smart device apps have notification settings. Enable for security-critical devices.
Step 5: Conduct Monthly Security Audits
Audit Checklist:
- Review router logs for suspicious activity
- Check for firmware updates (router + all devices)
- Verify all devices still on correct networks
- Review list of connected devices (remove unknown)
- Check password strength (any weak passwords?)
- Test backup/recovery procedures
- Review security device alerts
- Update device inventory list
Monthly Review Template:
Date: _______
New Devices Added: _______
Devices Removed: _______
Firmware Updates Applied: _______
Security Incidents: _______
Actions Taken: _______
Next Review: _______
Advanced Strategies for Power Users
Strategy 1: Deploy Multiple Router Setup
Use two routers in series for defense-in-depth:
Setup:
Internet → Modem → Router 1 (Primary) → Router 2 (IoT) → IoT Devices
                              ↓
                         Primary Network
Benefits:
- Complete isolation between networks
- Second layer of firewall protection
- Even if Router 2 compromised, Router 1 protects primary network
Strategy 2: Implement Pi-hole for DNS-Level Blocking
What Is Pi-hole:
Raspberry Pi-based DNS server that blocks ads, trackers, and malicious domains at the network level.
Benefits:
- Blocks malware domains
- Prevents IoT devices from “phoning home” to untrusted servers
- Ad blocking for all devices
- Fast (caches DNS queries)
Setup:
- Purchase Raspberry Pi 4 ($35-55)
- Install Pi-hole (30-minute setup)
- Configure router to use Pi-hole as DNS server
- Add blocklists (Steven Black’s list, EasyList)
- Monitor blocked queries
Pi-hole Dashboard Shows:
- Queries blocked (ads, trackers, malware)
- Top queried domains
- Devices making most queries
- Real-time statistics
Strategy 3: Use Unbound for DNS Privacy
What Is Unbound:
Recursive DNS resolver that queries authoritative DNS servers directly instead of relying on ISP or Google DNS.
Why It Matters:
- ISPs can see all DNS queries (every website you visit)
- Google DNS can track you
- Unbound queries root DNS servers directly (no middleman)
Setup:
- Install Unbound on Raspberry Pi (or router if supported)
- Configure Pi-hole to use Unbound as upstream DNS
- Done — private DNS queries
Special Considerations for Renters and Apartments
Challenge: No Router Access
Many apartment complexes provide managed Wi-Fi without router access.
Solution 1: Travel Router
Use a portable router as your personal gateway:
- Connect travel router to apartment Wi-Fi (as “client”)
- Create your own secure network from travel router
- Connect all devices to your secure network
Recommended Travel Routers:
- GL.iNet Beryl AX ($99) — Fast, VPN support
- TP-Link AC750 ($30) — Budget option
Solution 2: VPN on Individual Devices
If travel router not possible, install VPN apps on every capable device.
Challenge: Weak Apartment Wi-Fi
Solution: Ethernet Backhaul
If apartment provides ethernet:
- Connect your router via ethernet
- Disable apartment Wi-Fi on your devices
- Use only your router’s Wi-Fi
Troubleshooting Common Issues
Issue 1: Devices Won’t Connect After Security Changes
Causes:
- WPA3 incompatibility
- Hidden SSID causing issues
- MAC filtering blocking device
- Firewall rules too strict
Solutions:
- Try WPA2/WPA3 mixed mode
- Temporarily unhide SSID to test
- Add device MAC address to allowlist
- Temporarily disable firewall to isolate issue
Issue 2: Slow Speeds After VPN Enabled
Causes:
- VPN server too far away
- VPN protocol inefficient
- Router underpowered for VPN
Solutions:
- Connect to closer VPN server
- Switch to WireGuard protocol (faster than OpenVPN)
- Upgrade to more powerful router
- Enable split tunneling (only certain traffic through VPN)
Issue 3: Smart Home Hub Can’t Control Devices
Cause:
Network segmentation preventing hub from reaching IoT devices.
Solution:
Create firewall rule allowing hub to access IoT network:
Rule: ALLOW traffic from Hub IP (192.168.1.50) to IoT VLAN (192.168.2.0/24)
Quick Start: 30-Minute Security Boost
Don’t have time for full implementation? Start here:
Minute 0-10: Router Hardening
- Change router admin password
- Change Wi-Fi password (20+ characters)
- Update router firmware
- Disable WPS
Minute 10-20: Encryption & Segmentation
- Enable WPA3 (or strong WPA2)
- Create guest network for IoT devices
- Move all smart devices to guest network
- Enable guest isolation
Minute 20-30: Monitoring
- Enable router logging
- Set up email alerts for new devices
- Install security app (if router supports)
- Create calendar reminder for monthly audit
This 30-minute investment reduces your risk by 70-80%.
Conclusion: Your Network Security Roadmap
Building a secure smart home network is a journey, not a destination. Start with the basics (strong passwords, encryption, segmentation) and progressively add advanced layers (VPN, IDS, monitoring).
Your Implementation Timeline
Week 1: Foundation
- Router hardening
- Strong passwords
- WPA3 encryption
- Firmware updates
Week 2: Segmentation
- Create separate IoT network
- Move devices to appropriate networks
- Test device functionality
- Configure firewall rules
Week 3: Protection
- Deploy VPN (router-level)
- Enable monitoring/logging
- Set up device notifications
- Install security appliance (optional)
Week 4: Maintenance
- Conduct first security audit
- Review logs
- Test backup procedures
- Document configuration
Ongoing: Monthly
- Review logs
- Update firmware
- Check for new threats
- Adjust security as needed
The Bottom Line
Your smart home network is under constant attack. With 29 attempts per day, it’s not a matter of if but when an attacker probes your defenses. The difference between becoming another statistic and maintaining a secure home is the strength of your network security posture.
Invest the time now. Protect your family’s privacy, safety, and digital well-being.
Additional Resources
Recommended Tools:
- Password Manager: 1Password, Bitwarden
- VPN Services: ExpressVPN, NordVPN, Surfshark
- Security Appliances: Firewalla, Norton Core, Bitdefender Box
- Network Monitoring: GlassWire, Fing, Wireshark
Educational Resources:
- NIST Cybersecurity Framework
- SANS Internet Storm Center
- Krebs on Security blog
- r/homelab (Reddit community)
Testing Tools:
- Speedtest.net (test VPN impact)
- DNSLeakTest.com (verify DNS privacy)
- ShieldsUP! (test firewall)
- Fing app (network scanner)
Disclaimer: Network security configurations vary by router model and manufacturer. Always consult your router’s documentation. This guide provides general best practices but does not guarantee absolute security. Cybersecurity is an ongoing process requiring continuous vigilance and adaptation.


